Lever Seated One-Leg Curl: Form, Benefits, Sets, Tips & FAQ
Learn the Lever Seated One-Leg Curl for stronger hamstrings, better leg balance, and safer knee flexion. Includes form, sets, tips, FAQs, and equipment.
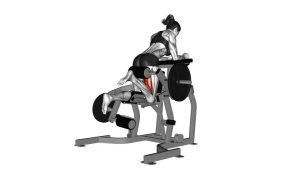
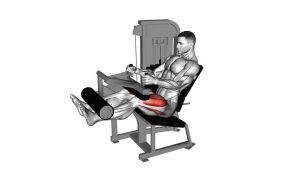
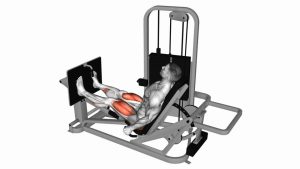
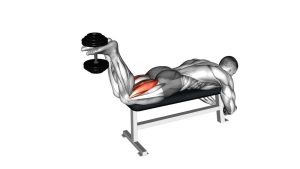
Lever Seated One-Leg Curl
This exercise works best when the movement is slow, strict, and focused on the working hamstring. Because only one leg moves at a time, the Lever Seated One-Leg Curl helps you notice strength differences between sides and train each hamstring with better precision. The goal is not to move the stack as fast as possible. The goal is to bend the knee smoothly, squeeze the hamstring at the bottom, and return with control.
Quick Overview
| Body Part | Hamstrings |
|---|---|
| Primary Muscle | Hamstrings: biceps femoris, semitendinosus, and semimembranosus |
| Secondary Muscle | Gastrocnemius, popliteus, and lower-body stabilizers |
| Equipment | Lever seated leg curl machine |
| Difficulty | Beginner to intermediate, depending on load and control |
Sets & Reps (By Goal)
- Beginner technique: 2–3 sets × 10–12 reps per leg with light-to-moderate weight.
- Muscle growth: 3–4 sets × 8–15 reps per leg with a controlled 2–3 second lowering phase.
- Strength focus: 3–5 sets × 6–10 reps per leg using heavier weight while keeping strict form.
- Muscle imbalance correction: 2–4 sets × 10–15 reps per leg, starting with the weaker side first.
- Warm-up activation: 1–2 sets × 12–20 reps per leg using light weight and smooth tempo.
Progression rule: Increase control before increasing weight. Add reps, improve the squeeze, or slow the eccentric phase before using a heavier load.
Setup / Starting Position
- Adjust the seat: Sit on the machine so your knees line up with the machine’s pivot point.
- Set the roller pad: Place the lower roller just above the back of your ankle, not high on the calf.
- Secure the thigh pad: Keep the thigh locked down so the hip does not rise during the curl.
- Choose one working leg: Keep one leg positioned against the roller while the other leg stays relaxed and out of the way.
- Grip the handles: Hold the side handles to keep your torso stable and your hips anchored.
- Start with control: Begin with the working leg extended or slightly bent, keeping the knee comfortable and not forcefully locked.
A good setup should make the movement feel smooth at the knee. If the pad pulls awkwardly or the knee does not match the machine pivot, adjust the seat before starting.
Execution (Step-by-Step)
- Brace lightly: Sit tall, keep your back against the pad, and hold the handles without shrugging your shoulders.
- Begin the curl: Bend the working knee and pull the roller downward and backward using your hamstring.
- Keep the hip still: Do not lift your hips, twist your pelvis, or lean forward to help the movement.
- Curl through a full safe range: Move until your hamstring reaches a strong contraction, without forcing the knee into pain.
- Squeeze briefly: Pause for 1 second at the bottom to feel the hamstring working.
- Return slowly: Let the leg extend back to the starting position under control.
- Reset and repeat: Keep every repetition smooth, controlled, and consistent before switching legs.
Pro Tips & Common Mistakes
- Start with the weaker leg: Match the stronger side to the same reps and weight to improve balance.
- Control the lowering phase: Do not let the machine pull your leg forward quickly.
- Avoid hip lifting: Keep your thigh pressed into the pad and your hips stable on the seat.
- Do not use momentum: A fast swing reduces hamstring tension and increases joint stress.
- Keep the ankle relaxed: Avoid over-pointing or over-flexing the foot if it distracts from hamstring contraction.
- Use a full but safe range: Train the hamstring through lengthening and shortening without forcing the knee.
- Pause at the squeeze: A short pause at peak contraction improves control and mind-muscle connection.
- Check machine alignment: Poor seat position can make the movement feel uncomfortable or reduce effectiveness.
FAQ
What muscles does the Lever Seated One-Leg Curl work?
The exercise primarily targets the hamstrings, including the biceps femoris, semitendinosus, and semimembranosus. The gastrocnemius can assist slightly because it crosses the knee joint.
Is the seated one-leg curl better than the regular seated leg curl?
It is not automatically better, but it is excellent for correcting strength differences between legs. The regular seated leg curl allows both legs to work together, while the one-leg version makes each hamstring work independently.
Should I go heavy on this exercise?
You can use heavier weight when your form is stable, but control should come first. If the hips lift, the torso rocks, or the weight drops quickly, the load is too heavy.
Where should I feel the Lever Seated One-Leg Curl?
You should feel it mainly in the back of the working thigh. A small amount of calf involvement can happen, but the hamstrings should be the main focus.
How slow should the movement be?
A good tempo is 1–2 seconds to curl, a brief squeeze at the bottom, and 2–3 seconds to return. Slower lowering improves control and keeps tension on the hamstrings.
Can beginners do this exercise?
Yes. The machine guides the movement, which makes it beginner-friendly. Beginners should start light, learn the machine setup, and focus on smooth reps before adding weight.
Recommended Equipment (Optional)
- Seated Leg Curl Machine — ideal for direct hamstring isolation and controlled knee-flexion training.
- Adjustable Ankle Weights — useful for lighter hamstring curls and home-based accessory work.
- Resistance Bands for Legs — helpful for warm-ups, hamstring activation, and knee-control drills.
- Exercise Mat — supports floor-based hamstring mobility, stretching, and recovery work.
- Foam Roller for Legs — useful for general lower-body recovery and soft-tissue preparation.
Tip: Equipment should support better movement quality. If a tool makes your knee, hip, or lower back feel worse, stop and adjust your setup.