Lying Obliques Crunch: Form, Sets, Tips & FAQ
Learn the Lying Obliques Crunch for stronger side abs, better core control, and clean rotation with step-by-step form, sets, tips, FAQs, and gear.
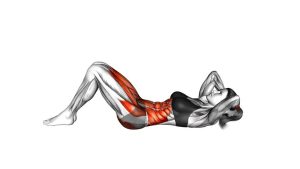
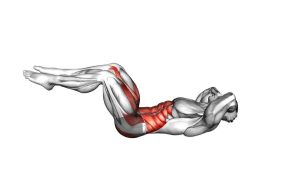
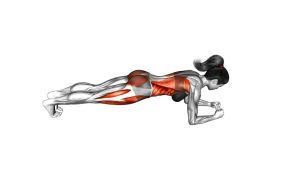
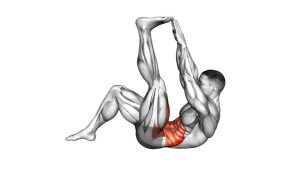
Lying Obliques Crunch
This exercise works best when every repetition stays small, clean, and controlled. Because the feet remain planted and the hips stay mostly stable, the obliques must create the rotation instead of the lower body. Additionally, the neck should stay relaxed while the abdominal muscles lift the shoulders from the floor. For better results, move slowly enough to feel the ribs drawing slightly toward one side of the pelvis.
Quick Overview
| Body Part | Core |
|---|---|
| Primary Muscle | Obliques |
| Secondary Muscle | Rectus abdominis and deep core stabilizers |
| Equipment | None; optional exercise mat for comfort |
| Difficulty | Beginner to intermediate, depending on tempo and control |
Sets & Reps (By Goal)
- Beginner core control: 2–3 sets × 8–10 reps per side with a slow, smooth tempo.
- Oblique endurance: 3–4 sets × 12–16 total alternating reps with steady breathing.
- Core definition focus: 3–4 sets × 10–15 reps per side with a brief squeeze at the top.
- Warm-up activation: 1–2 sets × 8–12 total reps before a larger abs or full-body workout.
Progression rule: First improve control, then increase reps. After that, slow the lowering phase or add a longer top squeeze.
Setup / Starting Position
- Lie on your back: Use a flat floor surface and keep your body long but relaxed.
- Bend your knees: Place both feet on the floor so the lower body stays stable.
- Position your hands lightly: Keep your hands near the head or temples without pulling on the neck.
- Brace gently: Tighten the abs enough to keep the ribs controlled and the lower back from arching excessively.
- Set your gaze: Keep the chin neutral and avoid folding the head forward aggressively.
Tip: Before the first rep, think about lifting through the ribs and shoulders instead of pulling with the arms.
Execution (Step-by-Step)
- Start from the floor: Keep both feet planted and prepare your core before moving.
- Lift the upper body: Raise the head and shoulders slightly off the floor using the abs.
- Rotate to one side: Turn the torso lightly so one shoulder rises more than the other.
- Squeeze the obliques: Shorten the side of the waist at the top without forcing a large twist.
- Lower with control: Return toward the starting position without dropping the shoulders suddenly.
- Switch sides: Repeat the same pattern to the opposite side in a smooth alternating rhythm.
Pro Tips & Common Mistakes
- Keep the feet grounded: Stable feet help the obliques do the work instead of the hips.
- Avoid neck pulling: The hands should support position, not create the lift.
- Use a small rotation: A clean squeeze is more effective than twisting too far.
- Control the lowering phase: Lower slowly so tension stays on the abs.
- Do not rush alternating reps: Move side to side with rhythm, but avoid bouncing.
- Exhale as you crunch: Breathing out helps the ribs move down and improves abdominal contraction.
- Keep the hips quiet: If the pelvis rocks side to side, reduce the range and slow down.
FAQ
What muscles does the Lying Obliques Crunch work?
The main target is the obliques, especially because the torso rotates slightly during each crunch. The rectus abdominis also assists because the upper body lifts from the floor.
Is this exercise good for beginners?
Yes. It can be beginner-friendly because it uses bodyweight only and a small range of motion. However, beginners should move slowly and focus on keeping the neck relaxed.
Should my elbow touch my knee?
No. The goal is not necessarily to touch the knee. Instead, aim to rotate the ribs toward one side while keeping the movement controlled and the feet grounded.
Why do I feel this in my neck?
Neck tension usually happens when the hands pull the head or when the abs are not controlling the lift. Therefore, keep the hands light, shorten the range, and lead the movement from the ribcage.
How can I make the Lying Obliques Crunch harder?
First, slow the lowering phase. Next, pause at the top for one to two seconds. After that, increase total reps only if your rotation stays clean and your neck remains relaxed.
Recommended Equipment (Optional)
- Exercise Mat — adds comfort for floor-based crunches and core training.
- Thick Yoga Mat — useful if your lower back or spine needs extra cushioning.
- Ab Workout Mat — supports repeated crunch variations during home ab sessions.
- Foam Roller — helpful for warm-ups, mobility, and recovery around core workouts.
- Fitness Towel — keeps the training area comfortable and sweat-controlled.
Tip: This exercise does not require equipment. However, a comfortable mat can make your reps smoother and easier to repeat consistently.