Resistance Band Lying Leg Raise: Form, Sets, Tips & Core Benefits
Learn the Resistance Band Lying Leg Raise for stronger abs, hip flexors, and core control. Includes setup, steps, mistakes, FAQs, and gear.
Resistance Band Lying Leg Raise
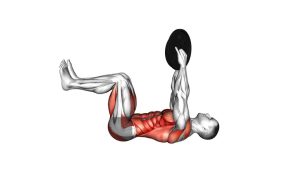
This exercise works best when the legs move together without swinging. First, keep your upper body quiet. Then, raise the legs under control until they approach a vertical position. After that, lower them slowly without letting the feet drop quickly toward the floor. As a result, the abs must work harder to control the pelvis and resist excessive lower-back arching.
Quick Overview
| Body Part | Core |
|---|---|
| Primary Muscle | Rectus abdominis, especially lower-ab control |
| Secondary Muscle | Hip flexors, transverse abdominis, obliques, and pelvic stabilizers |
| Equipment | Resistance band and floor space; exercise mat optional |
| Difficulty | Intermediate because the band increases resistance and demands strong core control |
Sets & Reps (By Goal)
- Core control: 2–3 sets × 8–12 slow reps with 45–60 seconds rest.
- Lower-ab strength: 3–4 sets × 10–15 reps with a controlled lowering phase.
- Hip flexor endurance: 2–3 sets × 12–18 reps using a lighter band and steady tempo.
- Beginner modification: 2 sets × 6–10 reps with a smaller range of motion or slightly bent knees.
- Advanced control: 3–4 sets × 8–12 reps with a 2–3 second lowering phase and no floor touch between reps.
Progression rule: First improve control and range. Then add reps. Finally, use a stronger band only when your lower back stays stable throughout every repetition.
Setup / Starting Position
- Lie on your back: Place your head, upper back, and hips on the floor with your body facing upward.
- Loop the band around both feet: Keep the band secure around the feet so tension stays even on both sides.
- Place your arms beside you: Rest your arms along your sides with your palms down to help stabilize the torso.
- Extend your legs: Start with both legs straight or nearly straight, together, and slightly above the floor.
- Brace your core: Gently tighten your abs before lifting so your pelvis stays controlled.
- Keep the neck relaxed: Let your head stay on the floor and avoid lifting your chin aggressively.
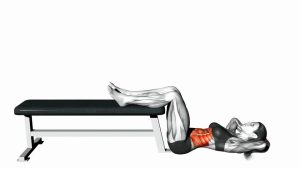
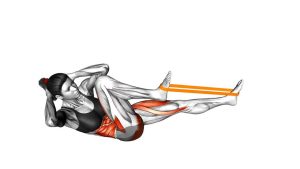
Setup note: The video shows the band looped around both feet while the subject lies flat on the floor and raises both legs together.
Execution (Step-by-Step)
- Start low: Begin with your legs extended and hovering slightly above the floor.
- Raise both legs together: Lift the legs upward in one smooth motion while keeping them aligned.
- Control the band tension: As your legs rise, allow the resistance band to stretch without jerking or snapping.
- Reach the top position: Continue until your legs are near vertical and your feet are roughly above your hips.
- Pause briefly: Hold the top position for a moment while keeping your core tight.
- Lower slowly: Bring your legs back down under control, moving against the band’s pull.
- Stop before losing control: Finish just above the floor, then repeat without relaxing your core.
Pro Tips & Common Mistakes
- Keep the legs moving together: Uneven foot position can shift band tension and reduce control.
- Lower slower than you lift: The lowering phase is where your abs work hard to control the pelvis.
- Avoid lower-back arching: If your back lifts too much, shorten the range or bend the knees slightly.
- Do not swing: Momentum makes the exercise easier and reduces core tension.
- Use the right band: A band that is too strong can pull you out of position and cause compensation.
- Keep your shoulders relaxed: Pressing the hands lightly into the floor is fine, but avoid shrugging or gripping hard.
- Control the bottom position: Do not let the heels slam down or fully relax between reps.
- Breathe steadily: Exhale during the lift and inhale during the controlled lowering phase.
FAQ
What muscles does the Resistance Band Lying Leg Raise work?
It mainly targets the abs through pelvic control, especially the lower portion of the rectus abdominis. In addition, the hip flexors assist during the leg raise, while the obliques and deep core help keep the body stable.
Is this exercise good for lower abs?
Yes. Although the abs work as one muscle group, this movement strongly challenges lower-ab control because the legs create a long lever. Moreover, the resistance band increases the demand during the lift and lowering phase.
Should my legs stay straight?
In the video, the legs stay mostly straight. However, a slight knee bend is acceptable if it helps you keep your lower back controlled and your movement smooth.
Why does my lower back arch during banded leg raises?
Your lower back may arch because the band is too strong, the legs are too low, or the core cannot yet control the full range. Therefore, use a lighter band, reduce the lowering range, or bend your knees slightly.
Can beginners do the Resistance Band Lying Leg Raise?
Beginners can do a modified version. Start with a light band, smaller range of motion, and fewer reps. Then progress only when each rep stays controlled.
How high should I raise my legs?
Raise your legs until they are near vertical and your feet are above your hips. However, do not force the range if your hips lift aggressively or your lower back loses contact with the floor.
Recommended Equipment
- Resistance Loop Bands — ideal for adding progressive band tension around the feet.
- Long Resistance Bands Set — useful if you want more length and smoother tension during leg raises.
- Thick Exercise Mat — adds comfort for the back, hips, and shoulders during floor core work.
- Resistance Band Ankle Straps — optional attachment for users who prefer band tension around the ankles instead of the feet.
- Core Sliders — useful for pairing with other controlled lower-ab and hip-flexor movements.
Equipment tip: Choose a band that lets you control both the lift and the lowering phase. If the band pulls your legs out of alignment, it is too heavy for this exercise.