Windmill on Chair: Seated Oblique Rotation Exercise Guide
Learn the Windmill on Chair exercise for seated core rotation, oblique control, flexibility, and safe step-by-step form.
Windmill on Chair
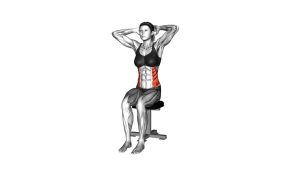
This exercise is performed from a seated position with the feet planted and the torso rotating from side to side. During each repetition, one arm reaches diagonally downward toward the opposite foot or lower-leg area while the other arm moves upward, creating a windmill-style motion. As a result, the movement challenges the side abs, trunk control, and upper-body coordination in a low-impact way.
Although the movement looks simple, it works best when every repetition stays slow, balanced, and controlled. Therefore, avoid swinging your arms with momentum. Instead, rotate through the torso, keep the hips stable on the chair, and return to the center with control before switching sides.
Quick Overview
| Body Part | Core |
|---|---|
| Primary Muscle | Obliques |
| Secondary Muscle | Rectus abdominis, transverse abdominis, spinal stabilizers, shoulders |
| Equipment | Chair |
| Difficulty | Beginner |
Sets & Reps (By Goal)
- Beginner control: 2 sets × 6–8 reps per side with a slow pace.
- Core endurance: 3 sets × 10–14 reps per side with steady breathing.
- Mobility and warm-up: 1–2 sets × 8–10 reps per side before a core or full-body session.
- Posture and coordination: 2–3 sets × 8–12 alternating reps with a smooth center reset.
Progression rule: First improve range, rhythm, and control. Then, gradually add more reps only if your torso rotation stays smooth and your lower body remains stable.
Setup / Starting Position
- Choose a stable chair: Use a firm chair without wheels so your base stays secure.
- Sit tall: Position your hips on the chair with your spine upright and your chest open.
- Plant your feet: Keep both feet flat on the floor to create a steady lower-body base.
- Prepare your arms: Raise or open your arms so they can move in a windmill-style pattern.
- Brace lightly: Engage your core gently before rotating, but avoid holding your breath.
Keep your hips grounded on the chair throughout the exercise. This helps the rotation come mainly from the torso instead of the legs.
Execution (Step-by-Step)
- Start upright: Sit tall with both feet planted and your arms ready to move.
- Rotate diagonally: Turn your torso toward one side as one hand reaches down toward the opposite foot or lower-leg area.
- Open the opposite arm: Let the other arm move upward or backward to create the windmill shape.
- Control the bottom position: Reach only as far as you can while keeping balance and avoiding a collapsed spine.
- Return to center: Reverse the movement slowly until your torso is upright again.
- Switch sides: Repeat the same diagonal reach on the opposite side with the same speed and range.
Pro Tips & Common Mistakes
- Rotate through the torso: Do not simply drop your chest forward. Instead, turn your ribs and shoulders as you reach.
- Keep the chair stable: If the chair shifts, stop and choose a safer surface before continuing.
- Avoid arm swinging: Momentum reduces core engagement, so keep each reach deliberate.
- Control both directions: The return to center should be just as smooth as the downward reach.
- Do not force the range: Reach only as far as your flexibility allows while keeping your breathing relaxed.
- Match both sides: Use the same tempo and range on the left and right side to build balanced rotational control.
- Keep your feet grounded: Stable feet help reduce unnecessary shifting through the hips.
FAQ
What muscles does the Windmill on Chair work?
The Windmill on Chair mainly works the obliques, which help rotate and control the torso. It also involves the deep core, rectus abdominis, spinal stabilizers, and shoulders as secondary support muscles.
Is the Windmill on Chair good for beginners?
Yes. Because the exercise is performed seated, it is generally easier to control than standing rotational drills. However, beginners should move slowly and avoid forcing the reach.
Should I touch my foot every rep?
Not necessarily. The goal is controlled rotation and diagonal reaching. If touching the foot causes rounding, strain, or loss of balance, reach toward the shin, ankle, or comfortable lower-leg area instead.
Can I use this exercise as a warm-up?
Yes. It works well as a light warm-up for core training, mobility work, or low-impact chair workouts. Keep the reps smooth and avoid fatigue during warm-up sets.
Why do I feel it more in my back than my abs?
You may be bending forward too much instead of rotating. Sit taller, brace lightly, reduce your range, and focus on turning your torso before reaching down.
Recommended Equipment
- Sturdy Workout Chair — provides a safer seated base for chair-based core exercises.
- Non-Slip Exercise Mat — helps prevent the chair and feet from sliding during seated movement.
- Yoga Blocks — useful as reach targets if touching the floor or foot is not comfortable.
- Mobility Stretching Strap — supports flexibility work that can improve comfortable reaching range.
- Core Training Exercise Mat — helpful for pairing this seated drill with floor-based core exercises.
Choose equipment that improves stability and comfort. However, do not use any tool that makes the chair unstable or encourages you to force the movement.