Sitting Opposite Touch on a Chair: Core Form, Benefits, Sets & Tips
Learn the Sitting Opposite Touch on a Chair to train core rotation, balance, and coordination with safe form, sets, tips, FAQs, and equipment.
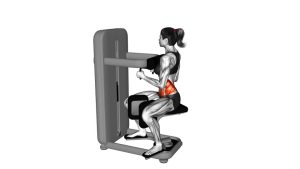
Sitting Opposite Touch on a Chair
This exercise is useful for beginners, desk workers, older adults, and anyone who wants a simple chair-based core drill. Because the movement is performed seated, it reduces impact while still challenging the abs, obliques, hip flexors, and posture muscles. Moreover, the cross-body pattern teaches the body to coordinate the upper and lower body together.
Quick Overview
| Body Part | Core |
|---|---|
| Primary Muscle | Obliques |
| Secondary Muscle | Rectus abdominis, hip flexors, transverse abdominis, spinal stabilizers |
| Equipment | Chair |
| Difficulty | Beginner |
Sets & Reps (By Goal)
- Beginner core activation: 2 sets × 8–10 reps per side with slow control.
- General fitness: 3 sets × 10–14 reps per side with a steady rhythm.
- Coordination and balance: 2–4 sets × 8–12 reps per side with a brief pause at the top.
- Low-impact conditioning: 3 rounds × 30–45 seconds with smooth alternating reps.
Progression rule: First improve posture and control. Then, increase reps, add a longer pause, or use a slower tempo before adding external resistance.
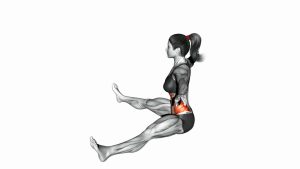
Setup / Starting Position
- Sit tall on a stable chair: Place your hips near the middle of the seat, not too far back.
- Plant both feet: Keep your feet flat on the floor with your knees bent around 90 degrees.
- Stack your posture: Lift your chest gently, keep your ribs controlled, and avoid rounding your lower back.
- Relax your shoulders: Let your arms stay free without shrugging toward your ears.
- Brace lightly: Tighten your core as if preparing for a small cough, but continue breathing normally.
For better control, use a chair that does not roll. Additionally, keep the movement small until you can rotate without leaning or bouncing.
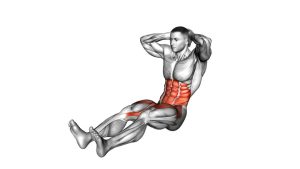
Execution (Step-by-Step)
- Begin upright: Sit tall with your eyes forward and your core lightly engaged.
- Lift one knee: Bring one knee upward while keeping your pelvis stable on the chair.
- Reach across your body: Move the opposite hand toward the lifted knee as your torso rotates.
- Touch or approach the knee: Aim for a controlled hand-to-knee touch without forcing the range.
- Pause briefly: Hold the top position for a moment while keeping the chest controlled.
- Return to center: Lower the foot and bring the torso back to the starting position.
- Alternate sides: Repeat the same pattern with the other hand and opposite knee.
Pro Tips & Common Mistakes
- Rotate with control: Turn through your torso instead of only reaching with your arm.
- Keep your spine tall: A small crunch is fine, but avoid folding completely forward.
- Move opposite sides together: Coordinate right hand to left knee, then left hand to right knee.
- Avoid momentum: Slow reps build better core engagement than fast swinging reps.
- Do not grip the chair hard: Let your core stabilize the movement as much as possible.
- Control the lowering phase: Bring the foot down softly instead of dropping it.
- Breathe naturally: Exhale as you rotate and lift, then inhale as you return to center.
FAQ
What muscles does the Sitting Opposite Touch on a Chair work?
It mainly works the obliques, which help rotate the torso. In addition, the rectus abdominis, hip flexors, transverse abdominis, and spinal stabilizers assist during the movement.
Is this exercise good for beginners?
Yes. Since it is performed on a chair, it is beginner-friendly and low impact. However, beginners should move slowly and keep the range of motion small until they can control both sides evenly.
Should my hand touch my opposite knee every rep?
Touching the knee is helpful, but it is not required. If your mobility or balance is limited, simply reach toward the opposite knee while maintaining good posture.
Can I use this exercise for a chair workout?
Yes. It fits well in chair workouts because it trains the core without floor positions. Furthermore, it can be paired with seated marches, seated twists, and chair squats for a complete low-impact routine.
How can I make the exercise harder?
You can slow down the tempo, pause longer at the top, increase total reps, or lightly hold a small fitness ball. Nevertheless, form should stay controlled before adding difficulty.
Recommended Equipment (Optional)
- Stable Workout Chair — provides a secure base for seated core and chair fitness exercises.
- Non-Slip Exercise Mat — helps keep the chair and feet stable during controlled reps.
- Small Soft Medicine Ball — can be used later for light progression and coordination drills.
- Mini Resistance Bands — useful for pairing the exercise with seated hip and glute activation.
- Fitness Interval Timer — helps structure timed chair workouts and low-impact core circuits.
Tip: Choose equipment that supports control and safety. For this exercise, the chair should be stable, non-rolling, and placed on a surface that does not slide.