Hollow Body Tuck: Proper Form, Core Benefits, Sets, Tips & FAQ
Learn the Hollow Body Tuck to build strong abs, core control, and hollow-body tension with proper form, sets, tips, mistakes, and gear.
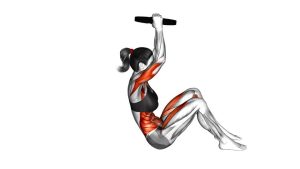
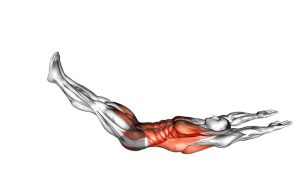
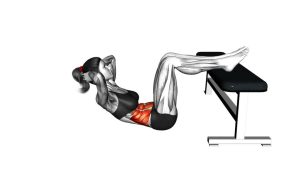
Hollow Body Tuck
This movement works best when every repetition stays smooth, quiet, and controlled. Your lower back should remain pressed into the floor while your shoulders stay slightly lifted. Meanwhile, your knees move toward the chest and then extend away without letting the ribs flare. Because the exercise keeps tension on the abs from start to finish, it is useful for calisthenics, gymnastics-style core training, and general bodyweight workouts.
Quick Overview
| Body Part | Core |
|---|---|
| Primary Muscle | Rectus abdominis |
| Secondary Muscle | Transverse abdominis, obliques, hip flexors, and deep core stabilizers |
| Equipment | None; optional exercise mat for comfort |
| Difficulty | Beginner to intermediate, depending on leg extension height and hold time |
Sets & Reps (By Goal)
- Core activation: 2–3 sets × 6–10 slow reps with a short pause in each tuck.
- Ab strength: 3–4 sets × 8–15 reps using a controlled 2–3 second extension.
- Hollow-body endurance: 3 sets × 20–35 seconds of continuous tuck-to-hollow movement.
- Beginner control: 2 sets × 5–8 reps with knees bent and legs kept higher.
- Advanced progression: 3–5 sets × 10–15 reps with longer leg reach and slower tempo.
Progression rule: First, improve lower-back contact and breathing. Then, extend the legs farther or lower them closer to the floor. However, do not increase difficulty if your back loses contact with the ground.
Setup / Starting Position
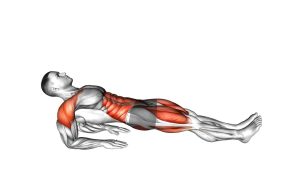
- Lie on your back: Start on a flat surface with your legs extended and arms reaching overhead or slightly forward.
- Set your pelvis: Gently tuck your pelvis so your lower back presses into the floor.
- Lift your shoulders: Raise the shoulder blades slightly while keeping the neck long and relaxed.
- Brace your core: Pull the ribs down and tighten the abs as if preparing for a light punch.
- Choose your range: Keep the knees bent if needed. A smaller range is better than losing control.
If you are new to hollow-body work, start with your legs higher and your knees bent. This position makes it easier to keep the lower back flat.
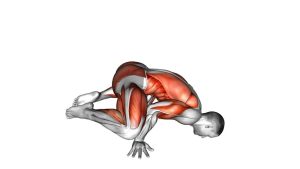
Execution (Step-by-Step)
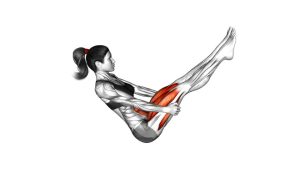
- Begin in the hollow position: Keep your arms long, shoulders lifted, legs hovering, and lower back pressed down.
- Pull into the tuck: Bring both knees toward your chest while your arms reach forward toward your legs.
- Pause briefly: At the top, squeeze the abs and keep the ribs down without rounding aggressively through the neck.
- Extend with control: Reach the legs away again while your arms move back overhead or slightly behind your head.
- Maintain tension: Stop the legs before your back arches. Then, pull back into the next tuck smoothly.
- Repeat with rhythm: Move in and out under control instead of using momentum or swinging.
Pro Tips & Common Mistakes
- Press the lower back down: This is the most important form cue. If your back arches, shorten the range immediately.
- Use a slow extension: The outward reach is where many people lose tension, so control that phase carefully.
- Avoid neck pulling: Keep your chin slightly tucked and your gaze toward your knees or ceiling.
- Do not rush the tuck: Fast reps often turn the exercise into a hip-flexor swing instead of an ab drill.
- Keep the ribs down: Rib flare reduces core tension and usually leads to lower-back arching.
- Breathe behind the brace: Exhale as you extend or tuck, but keep your abs firm throughout the rep.
- Adjust leg height: Higher legs are easier. Lower legs are harder. Therefore, choose the height that allows clean control.
- Stop before failure: Once form breaks, the exercise loses its purpose and may irritate the lower back.
FAQ
What muscles does the Hollow Body Tuck work?
The Hollow Body Tuck mainly works the rectus abdominis. In addition, it trains the transverse abdominis, obliques, hip flexors, and deep core stabilizers that help control pelvic position.
Is the Hollow Body Tuck good for beginners?
Yes, it can be beginner-friendly when performed with bent knees and a short range of motion. However, beginners should focus on keeping the lower back flat before trying longer leg extensions.
Why does my lower back arch during the exercise?
Your lower back usually arches when the lever is too long or your abs cannot hold the pelvic position. To fix this, bend your knees more, keep the legs higher, and move slower.
Should my feet touch the floor between reps?
Ideally, your feet should stay hovering to maintain constant tension. However, if you are learning the movement, you may lightly reset between reps until your control improves.
How is this different from a regular crunch?
A crunch mainly lifts the upper torso. By contrast, the Hollow Body Tuck challenges the abs while both the upper and lower body move, which makes it more useful for full-body core control.
Can I use this exercise for calisthenics or gymnastics training?
Yes. The Hollow Body Tuck builds the hollow-body tension used in movements such as handstands, pull-ups, toes-to-bar, L-sits, and many gymnastics-style core drills.
Recommended Equipment (Optional)
- Exercise Mat — adds comfort and grip during floor-based core training.
- Thick Yoga Mat — useful if your spine, hips, or shoulders need extra cushioning.
- Core Sliders — helpful for progressing into sliding tuck variations and body-saw drills.
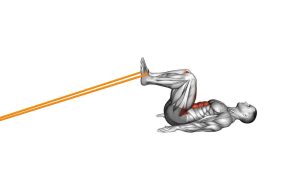
- Resistance Bands Set — useful for assisted hollow holds, warm-ups, and core accessory exercises.
- Ab Wheel Roller — a stronger progression tool for advanced anti-extension core strength.
Tip: Equipment is optional for this exercise. Nevertheless, a comfortable mat can improve consistency, especially when you perform multiple sets on a hard floor.