Diagonal Reach on Chair: Seated Oblique Stretch, Form, Tips & FAQ
Learn the Diagonal Reach on Chair to train obliques, improve seated trunk mobility, and build controlled side-bending strength.
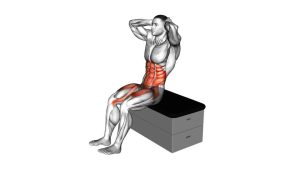
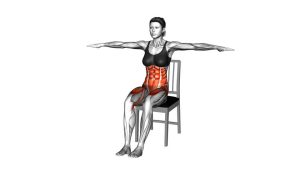
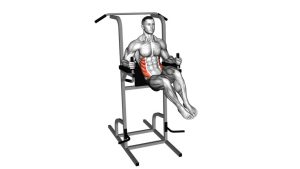
Diagonal Reach on Chair
This exercise works best when the reach stays smooth, tall, and controlled. Instead of collapsing into the side, sit upright first, anchor one hand on the chair, and then reach diagonally overhead with the working arm. As a result, the core learns to move through a clear range without rushing or using momentum.
Quick Overview
| Body Part | Obliques |
|---|---|
| Primary Muscle | Obliques |
| Secondary Muscle | Latissimus dorsi, intercostals, spinal stabilizers, shoulder flexors |
| Equipment | Chair |
| Difficulty | Beginner |
Sets & Reps (By Goal)
- Mobility warm-up: 1–2 sets × 8–10 reps per side with a slow, easy reach.
- Core control: 2–3 sets × 10–12 reps per side with a brief pause at the top.
- Posture and seated movement practice: 2 sets × 6–10 reps per side using a very controlled tempo.
- Beginner conditioning: 2–4 sets × 12–15 reps per side while keeping the hips stable.
Progression rule: First increase control and range quality. Then, add reps or a slightly longer pause only when the movement stays smooth.
Setup / Starting Position
- Sit on a stable chair: Keep both feet flat on the floor with knees bent comfortably.
- Stack the torso: Sit tall through the spine and keep the chest open without over-arching the lower back.
- Anchor one hand: Place the support hand on the chair beside the hip for balance.
- Relax the shoulders: Keep the neck long and avoid shrugging before the reach begins.
- Prepare the working arm: Let the reaching arm start near the side of the body before lifting it diagonally overhead.
Tip: A firm chair without wheels is best because it keeps the body stable during the side bend.
Execution (Step-by-Step)
- Start tall: Sit upright with feet planted and the support hand holding the chair lightly.
- Lift the working arm: Raise the arm upward and slightly across the body in a diagonal path.
- Reach overhead: Extend the arm long while the torso begins to lean diagonally to the opposite side.
- Control the side bend: Let the obliques guide the motion without collapsing the ribs or rounding forward.
- Pause briefly: Hold the top position for a moment while keeping the hips grounded on the chair.
- Return slowly: Bring the torso back upright as the arm lowers with control.
- Reset posture: Re-stack the spine before starting the next repetition.
Pro Tips & Common Mistakes
- Reach long, not hard: Think about length through the fingertips instead of forcing the spine deeper.
- Keep the hips down: Avoid lifting one hip off the chair during the side bend.
- Move diagonally: The arm should travel overhead and slightly across, not straight up only.
- Avoid collapsing the chest: Stay tall so the obliques work through a cleaner range.
- Use the chair for support: The planted hand helps balance the torso, but it should not pull the body aggressively.
- Control the return: Do not drop back to the start. Instead, use the core to guide the torso upright.
- Match both sides: Perform the same number of reps and similar range on each side.
FAQ
What muscles does the Diagonal Reach on Chair work?
The exercise mainly works the obliques. It also involves the side body, lat area, spinal stabilizers, and shoulder muscles during the overhead reach.
Is the Diagonal Reach on Chair good for beginners?
Yes. Because the movement is seated and supported by a chair, it is beginner-friendly. However, the movement should still be slow, controlled, and pain-free.
Should I feel a stretch or muscle work?
You may feel both. The reaching side may feel a gentle stretch, while the opposite side of the core helps control the bend and return.
Can I use this as a warm-up?
Yes. It works well as a warm-up before core training, mobility work, or upper-body sessions because it prepares the trunk for side bending and reaching.
What should I avoid during this exercise?
Avoid bouncing, twisting aggressively, lifting the hips, shrugging the shoulder, or forcing the spine into a painful range. Instead, keep the movement smooth and controlled.
Recommended Equipment (Optional)
- Sturdy Exercise Chair — provides a stable seated base for chair-based mobility and core drills
- Non-Slip Exercise Mat — helps keep the chair and feet more secure during seated movement
- Yoga Stretching Strap — useful for additional shoulder and side-body mobility work
- Foam Roller — helpful for upper-back and lat mobility before reaching exercises
- Resistance Bands Set — useful for pairing this drill with seated rows, pull-aparts, and posture work
Tip: Choose simple, stable equipment first. Better control is more important than adding resistance to this exercise.