Kettlebell Reverse Spider Curl: Proper Form, Sets, Tips & FAQ
Learn how to do the Kettlebell Reverse Spider Curl with proper form to target the brachialis, brachioradialis, and forearms. Includes setup, execution, sets by goal, common mistakes, FAQs, and recommended equipment.
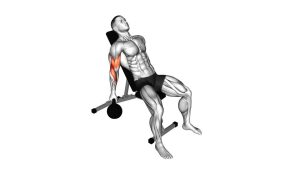
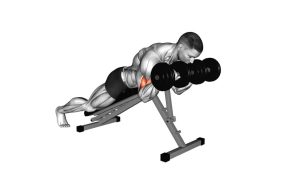
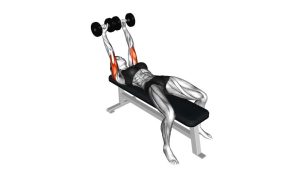
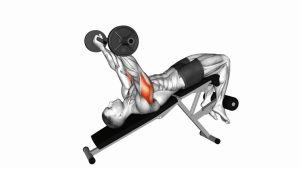
Kettlebell Reverse Spider Curl
Because your chest is supported and your arms hang straight down, the reverse spider curl makes it harder to cheat with body swing or shoulder drive. The kettlebell’s shape also adds a unique loading feel through the wrists and forearms, which can make this variation especially effective for lifters who want more brachialis and brachioradialis development. Focus on smooth reps, fixed elbows, and a controlled lowering phase to get the most from each repetition.
Quick Overview
| Body Part | Biceps |
|---|---|
| Primary Muscle | Brachialis |
| Secondary Muscle | Brachioradialis, biceps brachii, forearm extensors |
| Equipment | Kettlebells and incline bench |
| Difficulty | Beginner to Intermediate |
Sets & Reps (By Goal)
- Muscle growth: 3–4 sets × 8–12 reps with controlled tempo and 60–90 sec rest
- Forearm and brachialis focus: 3–4 sets × 10–15 reps with moderate weight and strict form
- Technique practice: 2–3 sets × 8–10 reps using lighter kettlebells and slower eccentrics
- Finisher work: 2–3 sets × 12–15 reps after heavier curls or pulling exercises
Progression rule: First improve range control, rep quality, and tempo. Then increase the kettlebell load gradually while keeping your elbows fixed and your wrists stable.
Setup / Starting Position
- Set an incline bench: Adjust the bench so you can lean your chest comfortably against it in a spider curl position.
- Grab the kettlebells: Hold one kettlebell in each hand with a pronated grip so your palms face backward/downward.
- Support the torso: Press your chest into the bench and let your arms hang straight down under your shoulders.
- Fix your elbow position: Keep the upper arms still and vertical with no shoulder shrugging or swinging.
- Brace lightly: Keep the core engaged, wrists neutral, and neck relaxed before starting the first rep.
Tip: Start lighter than you would for normal curls. The reverse grip and strict spider setup make this exercise feel harder very quickly.
Execution (Step-by-Step)
- Begin from a dead hang: Let the arms fully extend while keeping tension in the hands and forearms.
- Curl the kettlebells upward: Flex at the elbows only and bring the weights up in a smooth arc.
- Keep the reverse grip: Maintain the pronated hand position and avoid curling the wrists to cheat the load upward.
- Pause near the top: Squeeze the upper arms briefly when you reach peak contraction.
- Lower under control: Slowly extend the elbows and return to the starting position without dropping the kettlebells.
- Repeat with strict form: Every rep should look the same, with no torso movement or elbow drift.
Pro Tips & Common Mistakes
- Keep elbows pinned: The bench setup works best when the upper arms stay still from start to finish.
- Use controlled eccentrics: Lowering slowly increases tension on the brachialis and forearms.
- Don’t overload too early: Reverse-grip curls are more demanding on the wrists and forearms than standard curls.
- Avoid wrist curling: Don’t let the wrists bend excessively to help lift the weight.
- No body English: Since this is a spider curl, the torso should stay supported with minimal momentum.
- Think “forearms up, elbows fixed”: This cue helps maintain the right path and muscle emphasis.
FAQ
What muscles does the Kettlebell Reverse Spider Curl target most?
The main target is the brachialis, with strong assistance from the brachioradialis and forearms. The biceps still work, but the reverse grip shifts more attention away from them compared to a supinated curl.
Why use kettlebells instead of dumbbells for reverse spider curls?
Kettlebells can change the feel of the resistance because of how the load hangs below the hand. This often makes the exercise feel more demanding on grip, wrist stability, and forearm control.
Is this exercise better for forearms or biceps?
It is especially useful for brachialis, brachioradialis, and forearm development. It still trains the upper arms well, but it is usually chosen when you want more than just a standard biceps curl stimulus.
Should I use heavy weight on reverse spider curls?
Usually no. This exercise works best with strict technique, moderate loads, and controlled reps. Going too heavy often causes wrist strain, elbow movement, or shortened range of motion.
Can beginners do the Kettlebell Reverse Spider Curl?
Yes, as long as they use light kettlebells and focus on form first. Beginners should prioritize elbow control, wrist stability, and a slow lowering phase before increasing the weight.
Recommended Equipment
- Adjustable Kettlebell — versatile option for progressively loading curls without needing multiple kettlebells
- Cast Iron Kettlebell Set — useful for training both light technique work and heavier arm sessions
- Adjustable Weight Bench — essential for creating a stable spider curl setup with proper chest support
- Lifting Straps — optional for lifters whose grip fatigues before the target muscles during higher-rep sets
- Wrist Wraps — can help support wrist alignment if reverse-grip work feels unstable
Tip: For most lifters, the best investment for this exercise is a stable adjustable bench and a pair of kettlebells with manageable weight jumps.