Jackknife Floor Exercise: Proper Form, Core Benefits, Sets, Tips & FAQ
Learn how to do the Jackknife Floor exercise with proper form. Build stronger abs, improve core control, and master step-by-step technique with sets, tips, mistakes, FAQs, and equipment.
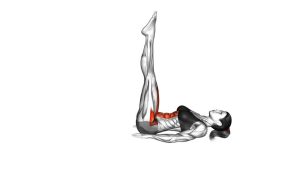
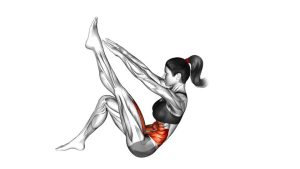
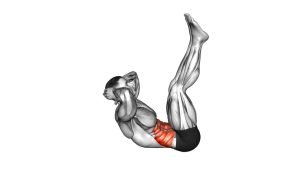
Jackknife Floor
This exercise is best performed with smooth control instead of speed. At the start, the body stays long on the floor with the arms extended overhead and the legs straight. Then, the torso and legs rise together as the hands reach toward the feet. Finally, the body returns to the floor slowly without dropping the legs or losing tension.
Although the Jackknife Floor looks simple, it requires strong abdominal coordination. Therefore, beginners should master basic crunches, lying leg raises, and dead bugs before using this movement as a main core exercise. When done correctly, it builds abdominal strength, improves body control, and creates a strong mind-muscle connection through the entire front side of the core.
Quick Overview
| Body Part | Core |
|---|---|
| Primary Muscle | Rectus abdominis |
| Secondary Muscle | Hip flexors, obliques, transverse abdominis, lower abs, upper abs |
| Equipment | No equipment required; exercise mat recommended |
| Difficulty | Intermediate to advanced |
Sets & Reps (By Goal)
- Core strength: 3–4 sets × 8–12 reps with slow control and full-body coordination.
- Muscle endurance: 2–3 sets × 12–20 reps using a steady rhythm and clean breathing.
- Beginner progression: 2–3 sets × 6–10 partial reps with bent knees or reduced range.
- Advanced core training: 4 sets × 10–15 reps with a 1-second pause at the top position.
- Finisher option: 2 rounds × 30–45 seconds, keeping each rep smooth instead of rushed.
Progression rule: First, improve control and range of motion. After that, increase reps, add a top pause, or slow the lowering phase. Do not progress by swinging harder.
Setup / Starting Position
- Lie flat on your back: Place your body on a comfortable exercise mat with your legs extended and your arms reaching overhead.
- Lengthen your body: Keep your arms long, legs straight, and feet together or close together.
- Brace your core: Lightly draw your ribs down and keep your lower back controlled before starting the rep.
- Relax your neck: Keep your head in line with your spine. Avoid forcing the chin toward the chest too early.
- Prepare to move together: The arms, torso, and legs should lift as one coordinated unit, not as separate pieces.
Tip: If your lower back arches at the bottom, bend your knees slightly or start with a smaller range of motion.
Execution (Step-by-Step)
- Start from a long position: Lie on the floor with arms overhead and legs extended straight.
- Exhale and brace: Tighten your abs gently before lifting. This helps protect the lower back.
- Lift arms and legs together: Raise your upper body and straight legs at the same time.
- Reach toward your feet: Bring your hands toward your toes, ankles, or shins depending on your mobility and strength.
- Create a V-shape: At the top, balance briefly on your glutes while keeping the abs strongly contracted.
- Control the lowering phase: Lower your torso and legs back toward the floor without dropping suddenly.
- Reset with tension: Return to the starting position, keep your core active, and repeat for the desired reps.
Pro Tips & Common Mistakes
Pro Tips
- Move both halves together: Lift your torso and legs at the same time to create a clean jackknife motion.
- Use your breath: Exhale as you rise, then inhale with control as you lower.
- Keep the legs straight but not locked hard: A slight softness in the knees can reduce hip flexor strain.
- Pause briefly at the top: A short pause improves abdominal tension and reduces momentum.
- Lower slowly: The eccentric phase builds strength, so do not waste it by falling back to the floor.
Common Mistakes
- Swinging the legs: Momentum reduces abdominal work and increases stress on the lower back.
- Pulling the neck forward: This can create neck tension. Let the abs lift the torso instead.
- Arching the lower back: If your back loses contact and control, shorten the range or bend the knees.
- Rushing each rep: Fast reps often become sloppy. Use a controlled tempo for better results.
- Reaching too aggressively: Touching the toes is not required. A clean reach toward the shins is still effective.
FAQ
What muscles does the Jackknife Floor exercise work?
The Jackknife Floor mainly works the rectus abdominis, which is the front abdominal muscle. It also trains the hip flexors, obliques, transverse abdominis, and deep stabilizers that help control the spine during the lift and lowering phase.
Is the Jackknife Floor good for abs?
Yes. It is an effective abs exercise because it combines upper-body flexion with straight-leg lifting. As a result, the abs work hard through both the top contraction and the controlled descent.
Is this exercise beginner-friendly?
It can be challenging for beginners. However, you can modify it by bending the knees, reducing the range, or performing one leg at a time. Once your core control improves, you can progress to the full straight-leg version.
Why does my lower back hurt during jackknifes?
Lower-back discomfort often happens when the abs lose control and the lower back arches. To fix this, brace before lifting, lower more slowly, bend the knees, or practice easier core drills first.
Should I touch my toes every rep?
No. Touching the toes is not required. The main goal is to lift with control and contract the abs. If you can only reach your shins while keeping good form, that is still a strong rep.
How can I make the Jackknife Floor harder?
You can slow down the lowering phase, pause at the top, keep the legs fully straight, or hold a light medicine ball. Progress only when your current reps stay clean and pain-free.
Recommended Equipment
- Thick Exercise Mat — adds comfort for the spine, hips, and tailbone during floor core exercises.
- Non-Slip Yoga Mat — helps prevent sliding while lifting and lowering the body.
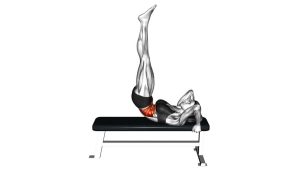
- Adjustable Ankle Weights — useful for advanced progression once bodyweight reps are fully controlled.
- Medicine Ball — adds resistance for stronger athletes who can maintain strict form.
- Core Sliders — helpful for building related core strength through controlled bodyweight movements.
Tip: Equipment should support better control, not hide poor technique. Start with a mat first, then add resistance only when your form remains stable.