Lever Seated Leg Raise Crunch: Form, Muscles, Sets & Tips
Learn the lever seated leg raise crunch with plate-loaded machine form, core muscles worked, sets, reps, mistakes, FAQs, and equipment tips.
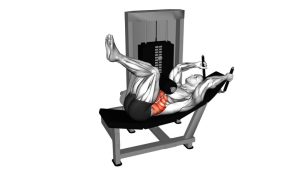
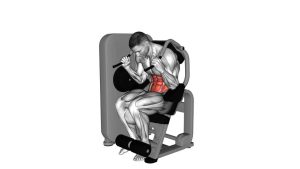
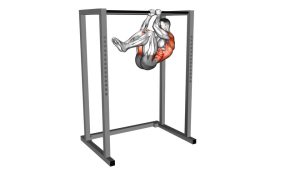
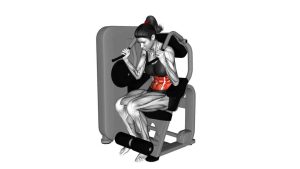
Lever Seated Leg Raise Crunch (Plate Loaded)
This exercise is useful when you want to train the abs with more load than a standard floor crunch or lying leg raise. During each rep, the legs rise toward the torso while the upper body stays supported by the seat and back pad. As a result, the movement strongly challenges the rectus abdominis, especially when you control the top crunch and avoid rushing the lowering phase.
Quick Overview
| Body Part | Abs |
|---|---|
| Primary Muscle | Rectus abdominis |
| Secondary Muscle | Hip flexors, lower abdominal region, obliques, deep core stabilizers |
| Equipment | Plate-loaded seated leg raise crunch machine |
| Difficulty | Intermediate |
Sets & Reps (By Goal)
- Core strength: 3–4 sets × 8–12 reps with controlled load and a firm top squeeze.
- Muscle building: 3–5 sets × 10–15 reps using a moderate plate load and slow lowering.
- Core endurance: 2–4 sets × 15–20 reps with lighter weight and steady breathing.
- Technique practice: 2–3 sets × 8–10 reps with very light resistance and strict tempo.
Progression rule: Add reps first, then increase plate load gradually. Also, keep the same smooth range of motion before making the exercise heavier.
Setup / Starting Position
- Choose the load: Add a light-to-moderate plate first, especially if you are learning the machine.
- Sit into the machine: Place your back against the support pad and keep your torso stable.
- Grip the handles: Hold the side handles firmly so your upper body does not swing during the rep.
- Set your legs: Position your lower legs or feet under the machine’s lever pad as shown by the machine design.
- Start controlled: Keep the legs down, knees slightly bent, ribs stacked, and abs lightly braced before the first lift.
Tip: Before adding heavier plates, perform a few unloaded or lightly loaded reps to feel the machine’s path.
Execution (Step-by-Step)
- Brace first: Exhale slightly, tighten your abs, and keep your back supported against the pad.
- Lift the lever: Drive the knees upward by flexing the hips while maintaining control through the machine path.
- Add the crunch: As the thighs move closer to the torso, curl the pelvis slightly and squeeze the abs.
- Pause at the top: Hold briefly without bouncing, jerking, or pulling excessively with the arms.
- Lower slowly: Return the lever toward the starting position with control instead of dropping the weight.
- Reset and repeat: Keep the rhythm steady, then begin the next rep only after the body is stable again.
Pro Tips & Common Mistakes
- Use the handles for stability, not momentum: They help anchor your body, but they should not turn the movement into an upper-body pull.
- Control the lowering phase: The eccentric portion builds tension, so do not let the lever fall quickly.
- Avoid excessive swinging: Momentum reduces abdominal tension and can make the movement less effective.
- Do not overload too soon: Heavy plates can force hip flexors and momentum to dominate before the abs are ready.
- Pause at peak contraction: A short squeeze at the top improves control and helps you feel the abs working.
- Keep the neck relaxed: Avoid straining the head forward while crunching.
- Maintain a repeatable range: Use the same controlled depth on every rep instead of shortening the motion as fatigue builds.
FAQ
What muscles does the lever seated leg raise crunch work?
It primarily works the rectus abdominis. In addition, the hip flexors assist because the legs move upward during each repetition. The obliques and deeper core muscles also help stabilize the torso.
Is this exercise better for upper abs or lower abs?
It trains the whole front abdominal wall, but many people feel strong tension in the lower abdominal region because the legs move toward the torso. Still, the rectus abdominis works as one connected muscle, so proper crunch control matters more than trying to isolate one section.
Should I use heavy weight on this machine?
Use enough weight to challenge your abs without forcing swinging, jerking, or lower-back discomfort. If your tempo breaks down, the load is probably too heavy.
How fast should I perform each rep?
Use a controlled tempo. For example, lift for 1–2 seconds, pause briefly at the top, then lower for 2–3 seconds. This keeps tension on the abs and reduces momentum.
Can beginners do the lever seated leg raise crunch?
Beginners can use it if the machine fits well and the load is very light. However, bodyweight core drills may be a better starting point if you cannot control the lever without swinging.
Recommended Equipment
- Olympic Weight Plates — useful for plate-loaded lever machines and progressive core training.
- Weight Plate Storage Rack — keeps plates organized near your machine or training area.
- Gym Training Gloves — can improve grip comfort when holding machine handles firmly.
- Ab Exercise Mat — helpful for warm-up core drills, dead bugs, crunches, and mobility work.
- Adjustable Ankle Weights — useful for accessory leg raise variations outside the machine.
Tip: For this exercise, the most important “equipment” is proper machine setup. Therefore, choose a load that allows smooth reps before increasing resistance.