Knee To Elbow Touch Front Plank: Form, Core Benefits & Tips
Learn the Knee To Elbow Touch Front Plank to build abs, obliques, shoulder stability, and core control with step-by-step form tips.
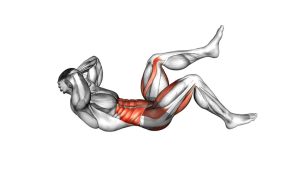
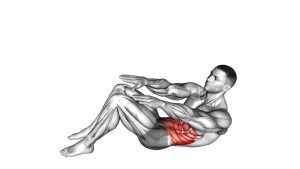
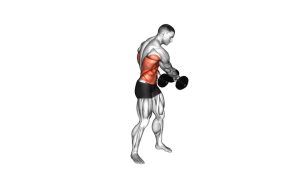
Knee To Elbow Touch Front Plank
This movement is most effective when each knee drive is controlled rather than rushed. First, build a strong plank line from head to heels. Then, bring the knee forward without letting the hips sag, twist excessively, or rise too high. As a result, the exercise becomes a clean core-strengthening drill instead of a loose mountain climber variation.
Quick Overview
| Body Part | Core |
|---|---|
| Primary Muscle | Rectus abdominis and obliques |
| Secondary Muscle | Hip flexors, transverse abdominis, shoulders, serratus anterior, glutes |
| Equipment | No equipment required; optional exercise mat for comfort |
| Difficulty | Beginner to intermediate, depending on tempo and control |
Sets & Reps (By Goal)
- Core control: 2–3 sets × 6–10 reps per side with a slow, clean tempo.
- Abs and oblique endurance: 3–4 sets × 10–15 reps per side with steady breathing.
- Dynamic conditioning: 3–5 rounds × 20–40 seconds, resting 30–60 seconds between rounds.
- Beginner practice: 2 sets × 5–8 reps per side, pausing briefly after each return to plank.
Progression rule: Add reps first, then increase time under tension. After that, use a slower return phase or a longer knee-to-elbow pause.
Setup / Starting Position
- Start in a high plank: Place your hands under your shoulders with arms straight but not locked aggressively.
- Set your feet: Keep your feet slightly apart so you can control the knee drive without wobbling.
- Brace your core: Pull the ribs down gently and keep your pelvis controlled so the lower back does not sag.
- Stack your body: Keep a long line from head to hips to heels before you begin moving.
- Look slightly ahead: Keep the neck neutral instead of dropping the head or looking too far forward.
Tip: If your wrists feel uncomfortable, warm them up first and spread your fingers to distribute pressure through the hands.
Execution (Step-by-Step)
- Hold the front plank: Begin with your shoulders stable, core tight, and hips level.
- Drive one knee forward: Bring one knee toward the same-side elbow while keeping your hands planted.
- Touch or reach close: Aim the knee toward the elbow without forcing contact if your range is limited.
- Control the trunk: Allow only a small natural rotation, but do not let the body swing side to side.
- Return to plank: Move the leg back until both feet are on the floor and your body line is reset.
- Switch sides: Repeat the same movement with the opposite knee and continue alternating.
Pro Tips & Common Mistakes
- Keep the hips controlled: Do not let the hips drop toward the floor as the knee comes forward.
- Avoid rushing: A slower knee drive usually builds better core tension than fast, sloppy reps.
- Push the floor away: Keep the upper back active so your shoulders do not collapse between the arms.
- Touch with control: The goal is not only knee contact; it is stable contact without losing plank alignment.
- Brace before each rep: Exhale slightly as the knee moves forward to improve abdominal engagement.
- Do not over-rotate: A small rotation is normal, but excessive twisting reduces core control.
- Reset when needed: If your form breaks, pause in plank before performing the next repetition.
FAQ
What muscles does the Knee To Elbow Touch Front Plank work?
It mainly works the abs and obliques. In addition, the hip flexors help drive the knee forward, while the shoulders, serratus anterior, glutes, and transverse abdominis stabilize the plank.
Is the knee supposed to touch the elbow?
Touching the elbow is helpful, but it is not required. Instead, focus on bringing the knee close while keeping the hips stable, shoulders strong, and lower back controlled.
Is this exercise good for beginners?
Yes, beginners can use it if they already hold a basic high plank with good form. However, start with fewer reps, move slowly, and reset after each side if your hips start to sag.
Why do I feel this in my shoulders?
Your shoulders stabilize the body during the plank. That is normal. However, if the shoulders feel strained, check that your hands are under your shoulders and that you are pushing the floor away.
How can I make the exercise harder?
Slow down the return phase, pause when the knee reaches the elbow, or perform the movement for longer timed sets. Additionally, you can place your feet closer together to increase the stability challenge.
Recommended Equipment (Optional)
- Exercise Mat — adds comfort for wrists, hands, knees, and floor-based core training.
- Push-Up Handles — may reduce wrist extension and improve hand comfort during high plank exercises.
- Workout Wrist Wraps — provide light wrist support for people who need extra stability during plank work.
- Core Sliders — useful for advanced plank variations and smooth knee-drive progressions.
- Non-Slip Training Shoes — help keep the feet stable during alternating plank movements.
Tip: This exercise does not require equipment. Still, a stable mat and good hand position can make the movement more comfortable and consistent.