Sitting In-Out Leg Raise on Padded Stool: Form, Sets, Tips & FAQ
Learn the Sitting In-Out Leg Raise on a padded stool for stronger abs, better core control, and seated leg tuck endurance with safe form.
Sitting In-Out Leg Raise on a Padded Stool
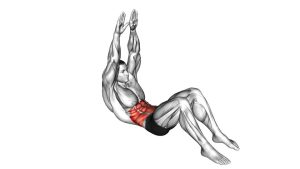
This exercise works best when the torso stays steady and the legs move with control. During the visible movement, the hands stay beside the hips for support, the torso remains slightly reclined, and both legs move together through an in-and-out pattern. As a result, the exercise trains the core to resist wobbling while the hips and knees flex and extend.
Although the movement looks simple, it can become challenging when the legs are fully extended. Therefore, beginners should use a smaller range of motion first. Then, once control improves, the legs can extend farther without swinging or losing posture.
Quick Overview
| Body Part | Core |
|---|---|
| Primary Muscle | Abs, especially rectus abdominis |
| Secondary Muscle | Hip flexors, deep core stabilizers, and obliques for balance control |
| Equipment | Padded stool or stable padded bench-style seat |
| Difficulty | Beginner to intermediate, depending on range of motion and leg extension |
Sets & Reps (By Goal)
- Beginner core control: 2–3 sets × 8–10 reps with a short range of motion and slow tempo.
- Core endurance: 3–4 sets × 12–15 reps while keeping the torso steady and the legs controlled.
- Lower-ab focus: 3–4 sets × 10–12 reps with a longer leg extension, only if the lower back stays comfortable.
- Bodyweight circuit training: 2–4 rounds × 20–30 seconds, using smooth reps instead of rushed movement.
- Form practice: 2 sets × 6–8 slow reps, pausing briefly in the tucked and extended positions.
Progression rule: First improve control. Then increase reps. After that, extend the legs farther or slow down the lowering phase. Do not progress by swinging faster.
Setup / Starting Position
- Choose a stable padded stool: Place the stool on a flat surface so it does not slide or wobble during the movement.
- Sit near the center or front area: Position your hips securely on the padded surface while leaving enough room for the legs to move freely.
- Place your hands beside your hips: Use your hands for light support, just as shown in the video. However, avoid pushing so hard that the arms do all the work.
- Lean slightly back: Keep the chest lifted and the torso controlled. The body should feel balanced, not collapsed.
- Lift both legs together: Start with the feet off the floor and the knees either slightly bent or extended forward, depending on your control level.
- Brace your core gently: Before moving, tighten the midsection enough to prevent the lower back from arching or rounding excessively.
If the full extended position feels too difficult, keep the knees more bent. This makes the exercise easier while still training the same in-and-out pattern.
Execution (Step-by-Step)
- Start in the extended position: Sit tall on the padded stool, lean slightly back, and extend both legs forward while keeping them elevated.
- Control your balance: Keep your hands beside your hips and maintain a steady torso before starting the first repetition.
- Pull the knees inward: Bend both knees and bring them toward the torso in a smooth, controlled motion.
- Pause briefly at the tuck: Once the knees are close to the chest, hold for a short moment without collapsing the shoulders or rounding aggressively.
- Extend the legs outward: Push the feet forward again until the legs return to the extended position.
- Keep the feet elevated: Avoid dropping the feet to the floor between reps unless you need to reset.
- Repeat with control: Continue the in-and-out motion while keeping the stool stable and the core engaged.
Pro Tips & Common Mistakes
Pro Tips
- Move both legs together: Keep the knees and feet traveling as one unit to improve coordination.
- Use your hands as support, not power: The hands should help balance your body, while the abs control the movement.
- Keep the torso steady: A small lean is visible and useful, but excessive rocking reduces core tension.
- Exhale during the tuck: Breathing out as the knees come in can help you brace the abs more effectively.
- Slow down the extension: The outward phase is where many people lose control. Therefore, extend the legs carefully.
- Shorten the range when needed: A clean short rep is better than a long rep with swinging.
Common Mistakes
- Swinging the legs: Momentum makes the exercise easier and reduces abdominal control.
- Dropping the feet too low: If the feet drop suddenly, the lower back may take more stress.
- Leaning too far back: Excessive recline can turn the movement into a balance struggle instead of a controlled core drill.
- Pressing too hard with the arms: Overusing the arms reduces the challenge on the midsection.
- Using an unstable stool: A moving stool can make the exercise unsafe and inconsistent.
- Rushing the tuck: Fast reps often hide poor control, especially during the transition from extended to tucked.
FAQ
What muscles does the Sitting In-Out Leg Raise on a Padded Stool work?
This exercise mainly works the abs, especially the rectus abdominis. Additionally, the hip flexors help lift and tuck the legs, while the deep core and obliques assist with balance and torso control.
Is this exercise good for lower abs?
Yes, it can be useful for training the lower-ab region because the legs move in and out while the trunk stays braced. However, the “lower abs” are not a separate muscle. Instead, the lower portion of the rectus abdominis becomes more challenged as the legs extend farther from the body.
Should my feet touch the floor between reps?
Ideally, the feet stay elevated during the set. However, beginners can touch down briefly to reset balance. Over time, try to keep the feet lifted for more continuous core tension.
Why do I feel this in my hip flexors?
Some hip flexor work is expected because the hips bend as the knees move in. Nevertheless, if the hip flexors dominate and the abs feel inactive, slow the movement, reduce the range, and focus on bracing before each tuck.
Is a padded stool required?
The video shows the exercise performed on a padded stool. A stable padded bench or firm padded seat may also work if it allows safe balance and free leg movement. However, avoid unstable chairs, rolling seats, or surfaces that slide.
How can I make this exercise easier?
Keep the knees bent, use a smaller range of motion, and allow the feet to lightly tap down between reps. Also, sit more securely on the stool and move slowly until balance improves.
How can I make it harder?
Extend the legs farther, slow down the outward phase, pause longer in the tucked position, or perform more continuous reps without touching the floor. Even so, only increase difficulty when your torso stays steady.
Recommended Equipment
- Padded Workout Stool — useful for recreating the seated support position shown in the exercise.
- Flat Padded Weight Bench — a stable alternative if you prefer a longer padded surface for seated core drills.
- Non-Slip Exercise Mat — helps keep the training area stable and protects the floor under the stool.
- Adjustable Ankle Weights — an advanced progression tool only after bodyweight form is controlled.
- Core Sliders — useful for related core exercises that train knee tucks and controlled leg movement.
Tip: For this exercise, stability matters more than equipment variety. Choose a stool or bench that does not wobble, slide, or feel too narrow during the in-and-out leg motion.